Module 3: Content

There are three ways to add images to your Lesson pages
Select the Picture Block from the Instructor-led Content Blocks drop-down menu - in the Content Blocks group on the LGPro ribbon
Select the Picture Wide Block from the Instructor-led Content Blocks drop-down menu
Use the Insert Images and Text function in the Insert group on the LGPro ribbon
This option allows you to insert images into any LGPro Content Block

No matter which option you choose:
Cursor placement is key
Wherever your cursor is:
your image will be inserted immediately below

To add an image into a Picture block
Place your cursor in the Content Block immediately above the spot where you want to add the Picture block
Select the Picture or Picture Wide block from the Instructor-led Content Blocks drop-down menu
You will be taken into Windows Explorer to navigate to your image. Select the image file you need and click OK
Your image must be in an image file format, such as .jpg or .png
Your image will be inserted into the Picture or Picture Wide block
No matter which option you choose
Cursor placement is key
Wherever your cursor is:
your image will be inserted immediately below
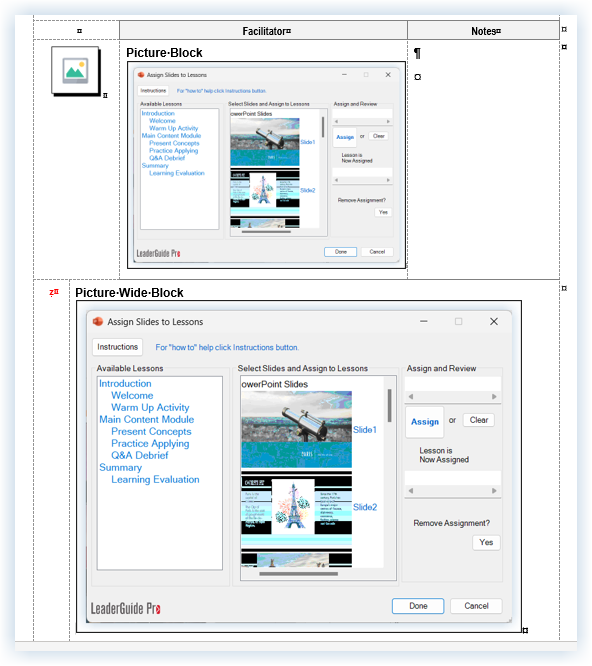
Examples of the Picture Block & Picture Wide block
In the Picture block, images are placed in column two by default.
You are given an option to put your image in Column 3.
In the Picture Wide block, images can fill the available space.
Based on the image size.
The column one icon is eliminated and the width is reduced.
The red Z in column one is non-printing and needed by LeaderGuide Pro
Columns 2 & 3 are merged to maximize image space.
Professionally adding images to your Lesson pages will ensure:
your images will stay where you need them to be
your images will sized appropriately for the space available
your images will be part of your document file, to ensure visibility

To use the Insert Pictures and Text dialog box:
Select the Pictures option
Select the Scale you need
Select the Insertion type
We recommend either Embedded or Both
Select the Border type
Or click No
Select the Caption type
Or leave this area blank
Click OK to insert your image
To add an image using the Insert Pictures & Text function
This option allows you to insert images into any existing Content Block

To begin:
Place your cursor in an existing Content Block, at a paragraph mark in the spot where you want the image to sit.
Click the Insert button in the Insert group on the LGPro ribbon
This will open the Insert Pictures and Text dialog box

your images will be easy to locate within your file
your images will be easy to resize as a batch if needed
it will be easy to review and revise image alt text if needed